
Remote Construction Monitoring: your key to cost savings
- Jun 15, 2023
- 5 min read
Updated: Jun 21, 2023
What is remote construction monitoring, and how can it help reduce costs and increase efficiency on-site?
Picture this - your camera becoming a powerful fee-saving tool in your construction project. As clients or builders, your active involvement in capturing accurate images of your construction site can significantly streamline the construction monitoring process and help reduce engineering and construction costs.
This handy guide written for homeowners and builders will equip you to take top-notch photos that pass our engineers' check, potentially cutting down on our on-site visits, and yes, those extra costs too. But bear in mind, some key construction aspects need the expert eyes of our engineers on site. Don't worry, we'll walk you through those scenarios in this guide as well.


The Importance of Construction Monitoring
So, what is construction monitoring all about? Think of it as your vigilant ally in the building world. It involves engineers regularly checking that your builder stays true to our designed plans. Not only does this ensure the project is on the right track, but it also gives you, the client, confidence that the build is shaping up as it should.
Here in New Zealand, this monitoring is extra important because it's how we engineers provide the all-important Producer Statement 4 (PS4). This is our seal of approval that the work meets the Building Code, and it's a must-have for getting the final Code Compliance Certificate (CCC) from the Council.
Now, with remote monitoring, the process just got much easier and cheaper. It's like having an engineer on call but without the call-out fee! Builders take detailed photos, and we review them, keeping a close eye on your project's progress. It's a modern solution to an age-old process, saving time, money, and effort.

Remote Construction Monitoring
This approach is a game-changer for projects in remote or hard-to-reach places. It helps circumvent travel challenges, saves money, and ensures construction progress without interruptions.
The benefit? It's akin to having a virtual engineer at your disposal. With up-to-date information and an array of photos or videos, we ensure your construction project maintains high quality and runs efficiently. It's indeed a smarter way of building.
Photos (and videos) for remote construction monitoring
So what kind of photos do we need, to monitor the project remotely? Here are a few examples!
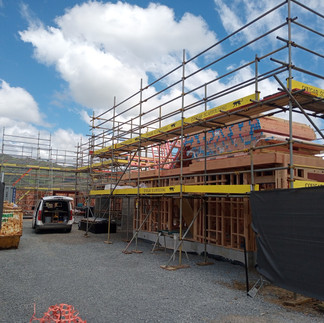
Type 1: Site Overview and walkthrough
This type comes in two parts: A site overview photo and video walkthrough. Capture the first type of photograph as you approach your site from the street. This panoramic view will provide us, and you, with a grand perspective of the property and where your project fits in. Once the site overview shot is taken, it's time for a video walkthrough. Starting from the site overview shot location, take a video walkthrough of the construction site focusing on the structural elements that are needed to be inspected. Walk slowly and carefully, making sure you focus on each of the structural elements for 2-5 seconds.


Type 2: General project photos
Here, we zoom in a little on the project itself, whether a new deck or house foundations. Regularly taken photos from a consistent point provide our engineers with an understanding of your project's progress over time. They also offer a surrounding context that captures the essence of the project at a particular moment.


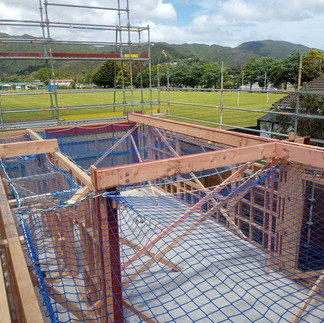


Type 3: The Details
The most important type. Close-up photos that highlight structural details and elements. Be sure to use flash for interior shots where lighting may be low. These details are important to show the engineer that they have been installed as per our designs. Each detail needs to be complemented by two types of shots:
Type 3A: Wide Angle Shot: This shot places the detail within the broader context of the project.
Type 3B: Close-Up Shot: These are your zoomed-in views, providing a precise depiction of whether the detail has been properly installed.


Our engineer will tell you which details they can have photos from you or your builder, and which need a formal site visit. Crucially, whether our engineer visits or you send photos, it’s important to ensure the engineer says the structural element meets our specifications before covering it.
Type 4: Measure up
Photographs with a measuring tape help us confirm that the onsite measurements align with the project's design specifications. This type of photograph should only be taken by the explicit instruction of our engineer, as anything that needs correct measurements will most likely need an engineer on site to check. Hold the measuring tape next to the detail you wish to highlight and make sure the reading on the measuring tape is visible. Like Type 3, each detail needs to be complemented by two types of shots:
Type 4A: Wide Angle Shot: This shot places the tape measure and gives context about what structural part you are measuring
Type 4B: Close-Up Shot: zoomed-in shot so you can see the measurement clearly on the tape measure


Sending photos to us - Don't text them! Builders and clients often send us photos embedded in emails or text messages. However, this creates extra administrative work extracting and saving these images. To streamline the process, it's best to send photos as individual attachments in an email or upload them to a cloud-based storage system like Dropbox or Google Drive.
We use Dropbox and can set up a dedicated folder for you to upload project photos. Just reach out to your engineer to arrange it!
Writing site notes/reports
Once our engineer receives and reviews the photos, we write a comprehensive site note.
This report is a crucial part of our Quality Assurance process and is required for issuing our Producer Statement Four (PS4).
Regardless of whether physical or remote construction monitoring is being conducted, we review the photos and write the site note. While the time spent on reviewing and writing is still billable, opting for remote monitoring significantly reduces costs, by cutting out our engineer's travel time, and time on site.
The site note/report is then issued to you, and you can use it to apply for a Code Compliance Certificate (CCC) upon completion of construction monitoring.
How can a builder help with construction monitoring
As a builder, you're not just building; you're also a crucial part of the remote monitoring process. Good Quality Assurance (QA) processes from your end set the stage for success. And those pictures you take? They're not just photos - they're valuable insights that can help the client reduce our fees via remote construction monitoring.
However, some things, like foundation reinforcing, are tough to discern from pictures or videos. So, we'd need to head to the site for an in-depth pre-pour assessment.

Even though we need to be on-site to assess physically, the more foundations ready for assessment in one visit, the better. It's like a well-planned road trip, covering as many places as possible in one journey, saving time and resources. For any other structural elements that will be covered up once construction is completed it's best to contact us first before doing so. Our engineer can let you know whether the photos or videos you’ve sent are good enough for our sign-off.,
Conclusion
To wrap up, active participation in the form of accurate photography can make remote construction monitoring much cheaper and just as effective as an engineer going to site. The power to streamline your project, save time, and reduce costs is, quite literally, in your hands.
When it comes to photography, remember these tips:
The more photos, the better.
Make sure your photos are high-quality and clear.
Capture wide-angle shots of structural elements for context and close-ups for detail.
Use a measuring tape for scale where needed.
Send the photos to us via email attachments or Dropbox/Google drive
However, even the best photos have their limits. In situations like the pre-pour inspection of foundations, or where the structural elements will be covered up, the expert eyes of an engineer are indispensable. By knowing when to click and when to call us in, you can ensure a smoother, more efficient construction process. Here's to building smarter, together.


Comments