
Surviving the Shake: The Ingenious Intersection of Seismic Restraints and BIM
- Jun 21, 2023
- 7 min read
Imagine the ground beneath your city starts to shake violently. What keeps critical building services and equipment secure in our buildings during such seismic events?
The answer is an ingenious system of seismic restraints. These are meticulously engineered to maintain the stability of essential components even when the earth rumbles. Journey with us as we dive deep into the fascinating world of seismic restraints. Using a recent project as a case study, we'll illuminate the best practices for architects, engineers, and project managers. Along the way, we'll shed light on Building Information Modelling (BIM), a crucial tool that sparks collaboration and brings the design to life in an unprecedented way.
We conclude with a handy checklist to streamline the design process of seismic restraints. So, brace yourselves as we navigate the intricate realms of seismic restraints and BIM.


Understanding Seismic Restraints
Primarily integrated into commercial building structures, seismic restraint of services is pivotal in protecting sensitive equipment and Mechanical, Electrical, and Plumbing Services (MEP). In regions like New Zealand, where seismic activities are common, these restraints are indispensable for minimising movement and damage to ensure public safety. They prevent pipes, cables, and HVAC systems from causing harm or obstructing safe evacuation during earthquakes.
The seismic restraint system, a potent mix of seismic bracing, anchorage systems, and vibration isolation devices, ensures the safety of equipment and infrastructure during seismic events, making it a necessity in earthquake-prone areas like New Zealand.
Our Recent Project
Let's transport ourselves to the heart of a recent project, where we designed seismic restraints for an impressive multi-million dollar museum extension in North Island, New Zealand. The building, at over 11,000m^2 had almost 2200m of piping and 1600m of ducting to be installed and restrained. Collaborating with a large MEP design and installation company, we undertook the challenge of integrating these restraints into the building. Our mission was to mitigate seismic forces throughout the museum, using products the client had already chosen, and our design expertise.
The Challenges and Solutions
Being brought into the project during its advanced design stages was a challenge. Intricate MEP systems were already pre-designed, and one of our main challenges was assessing whether these components met the seismic restraint standards. It felt like trying to fit a square peg into a round hole, given the minimal space within the building design for these restraints.
But every problem has a solution. Ours came in two parts:
Bespoke design: Using our in-depth knowledge of seismic restraints to design bespoke engineered solutions when the standard products on the market weren't sufficient.


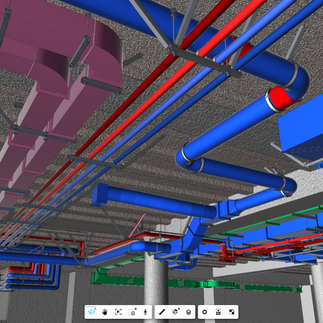
Leverage BIM: we used the power of BIM for clear and efficient communication to get up to speed on the project quickly. With several custom Revit families in tow, we streamlined the modelling process and simplified the procurement task for our client. We were also able to carry out successful clash detection of our seismic restraints using the shared cloud model.

By conducting a thorough force analysis, creating innovative solutions to conquer space constraints, and managing the project effectively with the BIM360 platform, we tackled the challenges head-on.
Key Takeaways and Influencing Factors
What can you learn from our experiences, you ask? Here's a handy checklist:
Start early: get a seismic restraint structural engineer on board as part of the design team to facilitate smooth collaboration.
Make room: Leave enough room for both the MEP services and their seismic restraints, particularly diagonal ones.
More structural elements = easier design: The more bearing elements near the services, the easier and cheaper the design and installation of seismic restraints.
Account for building height: The seismic force increases exponentially with each level, demanding stronger and more elaborate seismic restraints. E.g. on the upper floors, the seismic forces may be 3 times the design forces on the ground floor. You can ask our engineers why this is.
Expand product choices: Specifying a particular product for seismic restraint design limits the design scope. Keep your options open.
Limit Design Changes: Changes during the developed design phase often lead to variations and longer project delivery times.
Decoding BIM
One of the main reasons we were able to successfully complete this project was our extensive knowledge of Building Information Modelling (BIM) and how to leverage its use.
We've found it indispensable for projects of a certain size, but we think it could be very useful for smaller projects! Confused about what BIM is? Think of it as a 3D digital blueprint, a detailed guidebook containing the DNA of your building—architectural, structural, and service design. It is a virtual model that you can interact with, complete with all the elements. Just like a video game where you can build and interact with a virtual city, BIM allows professionals to create a 3D model of a building, complete with all the elements you'd find in the real thing - walls, doors, windows, plumbing, electrical systems, and so on.
But it's not just a 3D model; it also contains a ton of useful information about each of these elements. For example, if you click on a wall in the model, you can see what material it's made of, how much it costs, and plan how best to install/build it. What makes this model even more powerful is it's hosted in the cloud, allowing architects, engineers, and builders to access it at the same time and collaborate efficiently.
Without BIM, consultants work in isolated silos. They complete their portion of the drawings, and email it via pdf to the next in line. This potentially leads to lots of mishaps and miscommunications. But with BIM, we open a new chapter of optimized solutions, expedited construction processes, and spot-on cost estimations. Talk about simplifying complexity!
To BIM or not to BIM
For seismic restraint of services, there are two main approaches:
Solution 1 - 2D/3D Drawings
Engineers produce 2D or 3D drawings with plans, sections, and typical details of seismic restraints to cover all possible cases of services to be covered. The engineer also gives the builder a guide on how to tackle and support the services if there are any unique circumstances during construction.

Pros:
Faster and cheaper for the engineer to produce, as we are not involved with clash detection or helping in figuring out the construction process for non-standard supports.
Cons:
Has a much higher chance of increased unforeseen construction costs due to variations. This is due to the lower quality of the drawings meaning clashes are more common, and non-standard seismic supports need extra time to install properly.
Solution 2 – BIM and CDE
Engineers work in real-time in a Common Data Environment (CDE) alongside other consultants, usually by means of the BIM360 platform. This means all consultants are working on the same model simultaneously. In real-time within the CDE, seismic restraint engineers can locate specific installation spots and prepare a 3D seismic restraints model free from clashes.

Pros:
Allows for seamless coordination between all consultants
Highest level of accuracy
The client can be involved in Virtual Reality and a 3D walkthrough of the designed building structure
Contractor variations due to on-site issues significantly reduced
Cons
Most upfront expense (engineering fees can cost almost twice as much compared to solution 1 )
BIM is a powerful tool that enable engineers and other consultants to produce higher-quality solutions. However, using BIM does come with a higher upfront cost and can take substantial resources. So for any new project, the pros and cons should be weighed to determine whether BIM should be implemented during the project.
BIM in the wider industry
Some might pigeonhole BIM as a resource only for large-scale projects, but its power and utility extend far beyond that. BIM is a potent tool for all, even for smaller firms. Despite an initial investment, BIM can streamline your projects by reducing errors, fostering improved collaboration, and providing a stunning visual edge with virtual reality walkthroughs.
Remember, adopting BIM is more than just learning a new tool; it's a step towards future-proofing your firm. As smaller architects or consultants, implementing BIM will not only enhance your current work but also prime you for more significant future projects.
In essence, BIM is an investment with significant payoffs. It's time to dispel the myth that BIM is inaccessible for smaller entities. Embrace it and experience a level of project efficiency that will set you up for success.


Conclusion
Every construction project is a distinct adventure. With its unique trials and tribulations, each journey provides valuable insights that can be used to navigate future projects with greater ease and expertise. Here's a distilled list of do's and don’ts from our seismic restraint adventure to guide your way-
DO:
Start with a Shake: Always factor in seismic restraints during the early design stages. It's a vital safety measure, especially in seismic hotspots.
Retain Structural Elements: The more bearing elements in the building design, the easier and cheaper the seismic restraints will be.
Plan space wisely: Consider room for both the services and their seismic restraints.
Explore and Adapt: Be flexible in choosing seismic restraint products. The wider your options, the more likely you are to find the perfect fit for your project.
DON'T:
Frequently change: Avoid frequent changes to the architectural or services design.
Skip the Details: Overlooking intricate details in seismic restraint design can lead to inadequate protection during an actual seismic event.
Delay Decisions: Procrastinating on decisions related to seismic restraints can lead to potential delays and increased project costs.
Limit Learning: Don't shy away from learning new tools and technologies, like BIM, that can elevate your project management and design capabilities.
Every project is a dance between efficiency, timely execution, cost-effectiveness, and rigorous safety standards. We hope these lessons from our journey can provide useful footprints as you choreograph your project's success story, contributing to the resilient and innovative growth of our industry. Here's to building smarter, together.


Comments